

Week 10 & 11 - Easter Catch Up!
- Apr 1, 2018
- 4 min read


I've been a bit more relaxed over Easter as far as my weekly updates so I thought I'd compile what I've been up to into a more visually impact-full post to show what I've been up to since the change of game-play post from week 9. The biggest changes for me involves the lighting, set dressing and texturing of the scene which Im doing gradually throughout these weeks. To keep things consistent, I think it would be easier to follow if I talk about these changes in the order that I implemented them and then how it effects the scene as a whole.
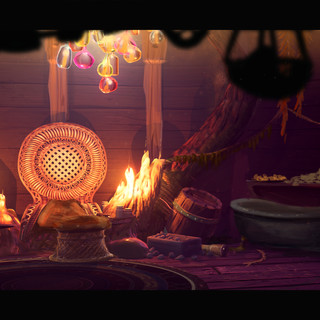
To start really digging into these block out models, I started by getting the main asset in the scene, as well as those in close proximity to the very least stages of having finished baked textures so that they were ready to start adding colour and PBR related finishes. The reason I started here was because I wanted to have a lot of time to get some feedback and really pollish this area of the scene because it was going to be the area of highest contrast for the viewer to travel to. I'm liking how this chair is merging with the melted candle wax. I also cant wait to see the effect with some subsurface scattering playing against some light/particle effects from the candle flame.
On a simpler note, I thought a nice straightforward asset to work on could be to work on the carpet. Getting this done at this stage colour wise is great for me because I now have a better idea as to what colour I should make the chair cushions to help with the unification of assets to each other as well as taking the opportunity to add a little more contrast and interest to my main focal piece. You will also notice since last week that I have now applied and tweaked the tiling textures that I made in the last update as well as bringing everything from the exterior that I could use to quickly and effectively flesh the scene out more without having to waste time creating everything from scratch. You'll see the effect of this more further down post.
The set dressing of this scene was a tricky one because I wanted to make the area look cluttered from the perspective of the game-play camera without the area becoming just a random area of noise. As far as teh detail break up, I feel like the moss will be doing a lot of the work meaning the textures shouldn't be as noisy in comparison. I'm hoping that by keeping this in mind with the other assets textures should result in a much more visually appealing result for the eye because the balance of creating a chaotic environment that's also composition-ally pleasing is a challenge in itself.

Now if we move forward in time a little, I've made some drastic changes to the lighting of the scene. My aim was to create a much warmer, almost nostalgic ambience to be a direct conflict of the outside scene. I utilised UE4's volumetric fog settings so that all of my lights bounce around more in closer proximity to the light source so you get this cloudy effect on the scene. To push the lighting further, I would like to bring out some of colours a little more in the textured objects which will be easier to do when there textured. The other area is that I would like to get a bigger impact from the glass bottle lighting that will also make more sense when I put the candle flames inside them so you can see that they are supposed to be a primary light source along with the candles by the chair.
On top of this, I've started getting some subsurface scattering working on the candles. I decided to create a mask that tells the material to let more light pass through the object in areas that are white and gradually let less through when the texture gets darker. The effect is that the areas where the candles are lit and are generally thinner will let more light pass through. This combined with a slight emissive colour with a scalar parameter to control intensity created this larger than life lit effect from the candles. I say it like this because in real life, The candles would not light the area this intensely, so I had to apply a little movie magic to make the effect look believable without the needs of unnecessary amounts of candles.
I started feeling towards the end of this week that the scene as it is, is currently utilising a little too much breathing room with not enough clutter. I also felt like adding more of the food orientated elements of the film itself as it directly links with the protagonists. I decided to take this shot from the scene and did a quick paint-over to see how I could really take this scene up a notch. As well as the obvious changes with level of detail and the addition of more visual noise, something that came up in this that I really want to implement was the effect of having a foreground to frame the platform style scene. This effect was done really well inside of 'Ori and the Blind forest' and I loved how they managed to create very cinematic look to the game whilst providing a lot of 3 dimensional depth. This effect will also imply a lot of clutter to the scene by utilising nice silhouettes whilst also giving a lot of area of rest because it will be a flat colour that has zero noise.
The ambience at the top of the paint-over mixing with the dust particles in the air is also something that I feel really helps this scene. I may also explore with a mixture of ways of creating this effect as I'm not sure currently what process to use for the greatest visual effect.
The next couple of weeks for me will be texture, texture and texture with the odd new model thrown into the mix for some fun. As I am now seeing my deadline on the horizon, I've got the drive to really start refining this scene to meet this concept.
Back to it!
Comments